keras image data generator tutorial with keras imagedatagenerator example
Keras image data generator will accept the original data and transform it that will return new data. Then CNN is transformed Keras Image data generator class. The tensor data generates the real-time data argumentation and data will loop. The argument means to make some greater and increase something then accepting a batch of images used for training. Then take the batch and apply a series of random transformation in the batch.
We replace the original batch with the new transformed batch.
Keras ImageDataGenerator and Data Augmentation:-
Three types of data augmentation
The dataset generation and data expansion using the data augmentation.
Then place on fly data augmentation.
After that combine the dataset generation and in-place augmentation
Functionality of the data generator:-
There are three methods as fit_generator, evaluate_generator, and predict_generator.
All require data generator but not all generators are created equally.
evaluate_generator:-
The data generator has the same requirements as in fit_generator is the same as the training generator.
fit_generator:-
They require two generators as one for the training data and another for validation.
So both of them return a tuple and both of them can be an instance of Sequence class.
predict_generator:-
The generator is different and should return only inputs.
The data generators are building because of the similarity between the generator in fit_generator and evaluate_generator we will focus on building data generators of fit_generator and predict_generator.
Data augmentation:-
Data argumentation is used to generate “new” training from the original by applying random jitters and perturbations.
It is evaluating by the trained network on the unmodified testing data.
They are more likely to generalize to data points not included in the training set.
Computer vision and data augmentation:-

It is obtained from the original images by applying simple geometric transforms,
- Translations
- Changes in scale
- Shearing
- Rotations
- Horizontal flips
Arguments:-
- x: Input data:-The Numpy array of rank 4 or a tuple.
- y: called as labels and used.
- batch_size: Int
- shuffle: Boolean
- sample_weight: The sample weights.
- seed: Int.
- save_to_dir: it allows specifying a directory to which we save an argument pictures being generated.
- save_prefix: The Str Prefix is used for the filenames of saved pictures.
- save_format: One of "png", "jpeg" Default: "png".
- Subset: The subset of data validation_split is set in ImageDataGenerator.
Load all images for corresponding to multiple classes with different data types:-
The loading of images with multiple classes but the catch is data types for columns. First, convert columns to a data type that are similar and then post data type modification. The class names in method arguments separated by a comma, which makes it perfect for regression. keras image data generator

Then changing data-type of label column from string to integer
An output of train_df dataframe post data-type conversion.
The dataframe is ready to be used for regression
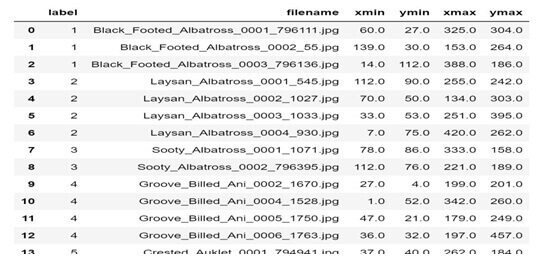
Then we load all images for multiple classes with different data-types using flow_from_dataframe
Keras API:-
Flow(x,y=None,batch_size=32,shuffle=True,sample_weight=None,seed=None,save_to_dir=None,save_prefix=””,save_format=’png’,subset=None)
Here, x is the Numpy array of rank 4 and y is the labels for grayscale image, channels must be equal to 1.
Then we save the augmented image to the disk by specifying the “save_to_dir” argument.
For selecting a format to save the image files and what prefix using the “save_format” and “save_prefix” arguments.
Data_generator=datagen.flow (img, save_to_dir=’D:/downloads/’, save_format=’jpeg’, save_prefix=’aug’)
Depending on the input length and validation_split argument in the ImageDataGenerator, index split is given as below,
Split_idx=int (len(x)*image_data_gnerator_validation_split)
The data is reserved for the training and splitting it also reserves first n examples for validation and rest for training.
The training and validation may have a different class after the split even if the data is not properly shuffled.
It will generate random parameters for a transformation using the following method,
“get_random_transform” method.
These transformations are applied to use the “apply_transform” method and then standardize using the” standardized “method.
Load Libraries and Data:-
from keras. layers import Dense, flatten, conv2D, MaxPool2D from keras. models import sequential from keras. datasets import mnist import numpy as np import matplotlib.pyplot as plt (x_train, y_train), (x_test, y_test) = mnist.load_data () x_train = np.expand_dims (x_train, axis=-1)
Build model:-
model = Sequential ()
model.add (conv2D (32, (3, 3), activation=’relu’, input_shape= (28, 28, 1)))
model. add (MaxPool2D ((2, 2)))
model. add (Conv2D (64, (3, 3), activation='relu'))
model. add (MaxPool2D ((2, 2)))
model. add (Flatten ())
model. add (Dense (512, activation='relu'))
model. add (Dense (10, activation='softmax'))
model. Compile (loss=’sparse_categorical_crossentropy’, optimizer=’Adam’, metrics= [‘accuracy’])
Data Augmentation:-
To create an ImageDataGenerator with the set of transformations you want to perform.
If you perform augmentation using transformation such as rotation, cropping, etc we create a separate generator for the validation set.
Use the validation_split argument instead of other methods for splitting.
Datagen=ImageDataGenerator (rescale=1/255., validation_split=0.2)
Flow method:-
The validation will split by creating a separate training and validation using subset.
Training_generator=datagen.flow (x_train, y_train,
Batch_size=64, subset=’training’, seed=7)
validation_generator = datagen.flow (x_train, y_train, batch_size=64, subset='validation', seed=7)
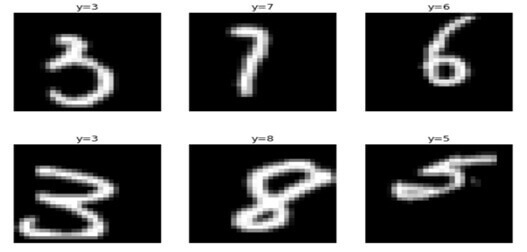
Visualize training generator:-
plt.figure (figsize= (10, 5))
for i in range (6):
plt.subplot (2, 3, i+1)
for x, y in training_generator:
plt.imshow ((x [0]/255).reshape (28, 28), cmap='gray')
plt.title ('y= {}'.format(y [0]))
plt.axis ('off')
break
plt.tight_layout ()
plt.show ()
Train model:-
History=model.fit_generator (training_generator, steps_per_epoch= (len (x_train)*0.8//64, epochs=10, validation_data=validiation_generator, validation_steps= (len (x_train)*0.2//64)))
1 tl; dr:
Here the keras are used for deep learning with convolution networks.
The millions of images and hundreds of GB for disk space.
The data frames and pandas to organize the file names.
2 Motivations:-
The original image files are stored in their “natural “place on our system.
The technique generalizes to regression models where the paradigm of naming sample directories after their classification labels breaks down.
The mini-batch processing is done by GPU while the multi-core CPU is building and maintaining a queue of properly transformed mini-batch design matrices.
This technique will allow GPU to operate at peak capacity without waiting on image file reading, resizing, transformation, etc.
3 Current standard practices for image directories:-
The image files do not reside in the directory structures as they are very possibly in a directory hierarchy that predates your machine learning application.
Also reflects some internal database structure organization of your company.
The fit generator () function is used here.
4 moving away from cats and dogs using database ids:-
We turn away from cats and dogs and our industry of advertising technology and the associated creative’s that are the actual images for advertisements.
The creative’s come in sizes with common width and height is 300x250 and 728x90.
5 Build a generator using a DataFrame:-
The Data Frames will contain a column of the filenames on your system instead of separate categorical directories.
We build generator using the Keras machinery and some threading safety.
6Using the image dataset with the new generator on a GPU machine:-
We separate into old-style label subdirectories only so our get_demo_data () function can find it and create the directory structure and DataFrame.
You would not make a copy of the image files and you would simply populate the DataFrame with the actual paths to the files.
Image classification using CNN:-
The Image classification is a classification of the images into their respective category classes using some method like:
- As Training a small network from scratch
- The fine-tuning the top layers of the model using VGG16
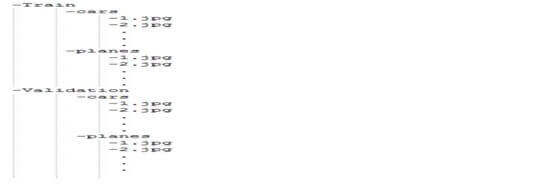
Train data:-It will contain 200 images of each car and planes as total of 400 images.
Test data:-
The data contains 50 images of each car and planes have a total 100 images in the test dataset.
Model description:-
The starting model first prepares the dataset and arrangements.
from keras.preprocessing.image import ImageDataGenerator
from keras. models import Sequential
from keras. layers import Conv2D, MaxPooling2D
from keras.layers import Activation, Dropout, Flatten, Dense
from keras import backend as K
Checking images:-
if K.image_data_format () == 'channels_first':
input_shape = (3, img_width, img_height)
else:
input_shape = (img_width, img_height, 3)
It will check data format as RGB channel first or last and model may check and then shape is given.
model = Sequential ()
model. add (Conv2D (32, (2, 2), input_shape=input_shape))
model. add (Activation ('relu'))
model. add (MaxPooling2D (pool_size= (2, 2)))
model.add (Conv2D (32, (2, 2)))
model.add (Activation ('relu'))
model. add (MaxPooling2D (pool_size= (2, 2)))
model. add (Conv2D (64, (2, 2)))
model. add (Activation ('relu'))
model. add (MaxPooling2D (pool_size= (2, 2)))
model. add (Flatten ())
model.add (Dense (64))
model.add (Activation ('relu'))
model.add (Dropout (0.5))
model.add (Dense (1))
model.add (Activation ('sigmoid'))
The conv2D: the layer is used to convolve image to multiple images.
Activation is the function to activate.
MaxpoolingD is used to max pool value from the size matrix and a same used for the next layers.
Dense is used to make a full connected model and the hidden layers.
The dropout is used to eliminate overloading.