tkinter module in python | tkinter tutorial python 3
tkinter module in python : Graphical User Interface (GUI) a desktop application which helps you to interact with the computers. It is also used to perform different tasks in the desktops, laptops and other electronic devices. The tutorial provides basic and advanced concepts of Python Tkinter. The Tkinter tutorial is designed for beginners and professionals. Tkinter is an inbuilt module used to create simple GUI applications. There is no need to worry about installation of the tkinter ,odule as it comes with python default.
Fundaments of tkinter module in python :-
The diagram, shows that how application will run
Firstly we import the tkinter model by following it we create main window.
In this we perform the operations and display visuals and everything basically.
After this add the widgets and lastly enter main event loop.
Two keywords are present as the widgets and the main event loop.
The event loop tells code to display the window until we close it manually.
In backend it will runs in infinite loop.
Python will provide the standard library Tkinter to design graphical user interface for desktop based applications.
For developing desktop based applications with python using Tkinter is very easy task.
Tkinter method is used as the GUI application(graphical user interface).
It is also a standard python interface in python it will give fast, easy way to create GUI applications.
It also provides the powerful object oriented interface to tkinter GUI toolkit.
Creating the tkinter:-
Importing the module tkinterCreate the main window (container)
Add any number of widgets to the main window
Apply the event Trigger on the widgets.
Creating a GUI application using tkinter is easy by following steps:-
Import the Tkinter module.Create the GUI application main window.
Add one or more widgets to the GUI application.
Enter the event loop to take action against event triggered by the user.
Tkinter widgets:-
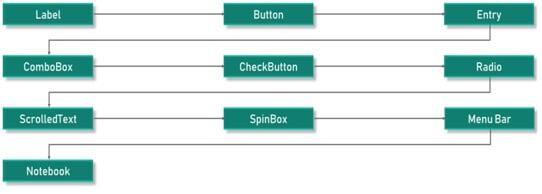
Menu: – Menu is used to create menus in the GUI.
Canvas: – Canvas is used to draw the shapes in GUI.
Entry: – Entry widget is used to create input fields in the GUI.
Label: – Label is used to create a single line widgets like text, images etc.
Check button: – Check button is used to create the check buttons in your application. Note that you can select more than one option at a time.
Frame: – Frame is used as containers in the Tkinter.
Button: – Button widget is used to place the buttons in the Tkinter.
Layout managers in python:-
1. Pack layout manager2. Grid layout manager
3. Place layout manager
1. Pack layout manager:-
The pack layout manager is one of the oldest layout managers in python tkinter.The pack layout manager packs the widgets in the rows and columns and the options used can be fill, expand in this geometry.
The manger handles the widgets packed inside same master widgets.
The algorithm of packing is simple but tricky.
Compared to the grid manager the packer is limited but easy to use
The following are the situations when to use it:-
Put a widget inside a frame and have it fill the entire frame
Now Place a number of widgets on top of each other
Then Place a number of widgets side by side
When all widgets have been packed into the hole, the manager calculates the bounding box for all widgets.
Then makes the master widget large enough to hold all widgets move them all to the master.
Example -
_author__ = 'Avinash' from tkinter import * root = Tk() root.geometry('400x400+100+200') # fill option # side option # expand option |
O/p:-
2. Grid layout manager :-
The grid geometry manager put the 2 widget in the two dimensional table.The master widgets split into the number of rows and the columns.
Then the each cell holds the widgets it is most flexible manager in tkinter.
If you don’t know to use you should learn this one.
The grid is more flexible layout manager out of the GUI managers in python language.
The grid allows you to position the elements in rows and columns which will give the flexibility to widgets.
Simply create the 2x2 table using grids row and column.
Following example:-
Creating of this layout using pack manager is very easy but it will take frame widgets and lot of work to make the things.
In grid manger you need one call per widget to lie out properly.
Example :-
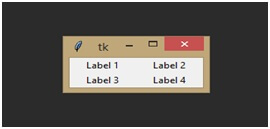
I will create a simple 2×2 table like structure using grid’s rows and column way.
_author__ = 'Avinash'
from tkinter import *
Label(text="Label 1", width=10).grid(row=0, column=0)
Label(text="Label 2", width=10).grid(row=0, column=1)
Label(text="Label 3", width=10).grid(row=1, column=0)
Label(text="Label 4", width=10).grid(row=1, column=1)
mainloop()
Output :-
__author__ =
3. Place layout manager :-
For ordinary window it is not good to use the dialogue layout, it is simply to get the things done in this situation the pack or grid is used.The place has its own uses in specialized cases and can be used by the compound widget to implement custom geometry managers.
The next use is to the position control button in dialogs
Then the place geometry is that are playing around the colors.
It is the complex manager out of the 3 managers and uses the positioning when we choose place as the layout manager then you need widgets in x and y coordinates.
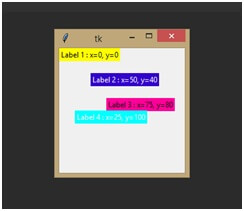
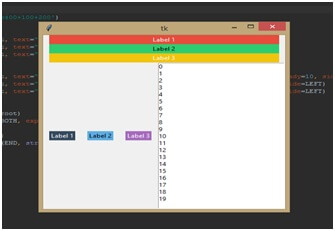
I will create a simple 4 labels in which the position is based upon x and y coordinates.
Example :-
from tkinter import *
root = Tk()
root.geometry('200x200+100+200')
Label(root, text="Label 1 : x=0, y=0", bg="#FFFF00", fg="black").place(x=0, y=0)
Label(root, text="Label 2 : x=50, y=40", bg="#3300CC", fg="white").place(x=50, y=40)
Label(root, text="Label 3 : x=75, y=80", bg="#FF0099", fg="black").place(x=75, y=80)
Label(root, text="Label 4 : x=25, y=100", bg="#00FFFF", fg="white").place(x=25, y=100)
mainloop()
Output :-