kivy Python android tutorial
kivy python android tutorial : The kivy is a library of python and supports multi-touch devices.
Used for documentation and installation.
They are run on the android phones using kivy launcher. The applications are building using the python for android.
Using Python for Android:-
The “Hello world” of using the kivy and the program is called as the main.py.
from kivy.app import app
from kivy.uix.button import Button
class TestApp (App):
def build (self):
return Button (text=’Hello World’)
if_name_int (‘_main_’,’_android_’):
testApp ().run ()
The program will test on the desktop before building an android.
To test the android phone we connect the android to a machine using the USB and make USB debugging connect then the USB is disabled and debugging goes to setting application development.
Currdir=’pwd’
Cd$python4Android/dist/default
Rm bin/myapp*
./build.py—package org.test.myapp—name myapp—version 1.0—dir$currdir debug
Adb install –r bin/myapp-1.0-debug.apk
The orientation is landscape and changes by adding the portrait to build.
The kivy app is distributed like including the stores like play store and behave properly.
Package for android:-
They will provide tools to package and app on android including building and application that may be distributed the market.
Debugging application in android:-
The normal output of code as well as normal kivy through an android logcat stram.
They will be accessed through the adb, by android SDK.
Adb logcat:-
If a package is packed on the app with buildozer the adb tool may not be in $PATH.
Buildozer android logcat.
Using Android APIs:-
It is a framework of python and the project maintains the tool to use normal APIs from vibrations to sensors and sending messages through email/SMS.
Plyer:-
The pythonic platform-independent on API to use features found on various platforms like mobile phones.
The app will simply call the plyer function as the notification to the user.
Example:-
From plyer import vibrator
Vibrartor.vibrate (10)
Pyjnius:-
It is a python module that will access java classes directly from python converting arguments to the right type and convert java to python.
Example:-
From jnius import autoclass
Context=autoclass (‘android.content.Context’)
PythonActivity=autoclass (‘org.renpy.android.pythonActivity’)
activity=PythonActivity.mActivity
Vibrartor=activity.getSystemService (Context.VIBRARTOR_SERVICE)
vibrartor.vibarte (100)
Android module:-
It will include the python module to access limited set of android APIs.
It will include the billing/IAP and create android services,
Status of project and tested device:-
The android tool is quite stable and works with any device and minimum requirement as OpenGL ES 2.0.
The tool is used to compile on ARM and does not run on android devices with x86 processors.
Install on android:-
In python framework, the kivy is installed in an android device as a classical desktop machine and complied with android based APK like java app device.

Figure 2: Download page of Kivy
Installation on Raspberry Pi:-
They can be installed on Raspberry Pi manually after downloading them.
The KivyPie can be booted on the Raspberry Pi itself.
Manual installation on Raspbian:-
To install the dependencies,
$sudo apt-get update
$sudo apt-get install libsdl2-dev libsdl2-image-dev libsdl2-mixer-dev
Libsdl2-ttf-dev
Gstreamer 1.0-plugins-{bad, base, good,ugly}
Python-setuptools libgstramer 1.0-dev git-core
Pkg-congig libg1-mesa-dev libgles2-mesa-dev
Configuring kivy:-
The congig.ini is the file of Kivy which is standard INI format.
<user-home-directory>/.kivy/config.ini
Windows:-c:\users\Myuser\.kivy\config.ini
Os X:/user/myuser/.kivy/config.ini
Android:</my-android-app-path>/.kivy/config.ini
Ios:<user-home-directory>/Documents/.kivy/config.ini
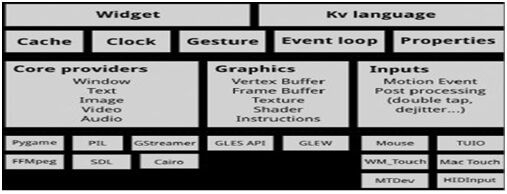
Architecture of Kivy:-
the Kivy has number of building blocks that work together for development, execution of the mobile apps.
Creating a basic app:-
the basic app in Kivy is to print a message on the mobile device.
Example:-
From kivy.app import App
From kivy.uix.button import Button
Class GoodMorning import Button
Def build (self):
Return Button (text=Good Morning to all of you)
GoodMorning ().run ()
kivy python android tutorial
Creating code for a weather app:-
The code makes use of inheritance to create the subclass of WeatherApp.
Example:-
From kivy.app import App
Class MyweatherAnalysisApp (App):
Pass
If_name_==_main_:
MyweatherAnalysisApp ().run ()
Timer clock:-
The simple timer clock application is created and it is similar to clock inbuilt with Android.ios and mobile platforms.
Example:-
From kivy.app import app
Class MyclockTimerApp (App)
Pass
If_name_==_main_:
MyclockTimerApp ().run ()
BOXLAYOUT: orientation: vertical
Label:
Text: 00:00:00
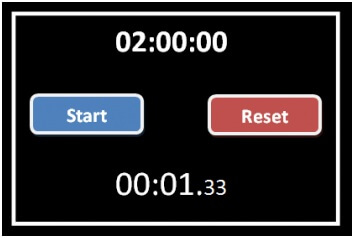
Figure 4: Timer clock app in Kivy
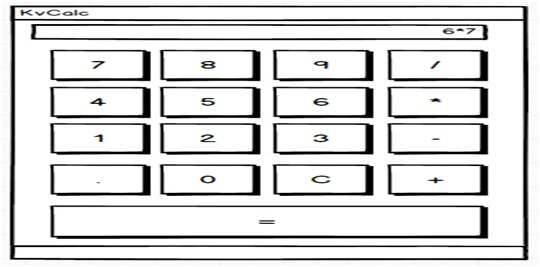
Creating a Kivy Application:-
We use Kivy to build a calculator that will support the following operations:
- Multiplication
- Division
- Addition
- Subtraction
We need a box along the top of your app to display the equations and their results.
Example:-
From kivy.app import App
From kivy.uix.boxlayout import BoxLayout
From kivy.uix.button import Button
From kivy.uix.textinput import TextInput
Class MainApp (App):
Def build (self):
Self.operators= [“/”,”*”,”+”,”-”]
Self.last_was_operators=None
Self.last_button=None
Main_layout=BoxLayout (orientation=”vertical”)
Self.solution=TextInput (multiline=False, readonly=True, haling=”right”, font_size=55)
Main_layout.add_wadget (self.solution)
Buttons= [[“7”,”8”,”9”,”/”],
[“4”,”5”,”6”,”*”],
[“1”,”2”,”3”,”-”],
[“.”,”0”,”C”,”+”],]
For row in buttons:
H_layout=BoxLayout ()
For label in row:
Button=Button (text=label, pos_hint= {“center_x”:0.5,”center_y:0.5”},)
Button.bind (on_press=self.on_button_press)
H_layout.add_widget (button)
Main_layout.add_widget (h_layout)
Wquals_button=Button (text=”=”, pos_hint= {“center_x”:0.5, center_y”:0.5})
Equals_button.bind (on_press=self.on_solution)
Main_alyout.add_widget (equal_button)
Return main_layout
At line 8to 10 we create the list of operators and couple of handy values.
The 11to 15 are top-level layout main_layout and add read-only TextInput widget.
Then we create the nested list of lists and contain most of the buttons for a calculator.
Then the line 22 will start for loop over buttons and each nested list as,
Line 23 will create the BoxLayout with horizontal orientation then start for loop over items in a nested list.
Next, we create the buttons for row and add them to horizontal BoxLayout.
Then we create an equal button to an event handler and add it to main_layout.
Def on_button_press (self,instance):
Current=self.solution.text
Button_text=instance. text
If button_text==”C”:
Self.solution.text=””
Else:
If current and (self.last_was_operator and button_text in self.opeartors):
Return
Elif current==””and button_text in self.operators:
Return
Else:
New_text=current+button_text
Self.solution.text=new_text
Self.last_button=button_text
Self.last_was_opearator=self.last_button in self.opearators
We take the instance of argument ad access the widget called function.
Then we extract and store the value of solution and button text.
Then check which button was pressed and if user presses c then a clear solution.
We check to see the last button pressed as the operator button.
We see first character t is operator and then check it.
Def on_solution (self, instance):
Text=self.solution.text
Of text:
Solution-str (eval (self.solution.text))
Self.solution.text=solution