LSTM keras tutorial
LSTM keras tutorial : In a stateless LSTM layer, a batch, has x inner states, one for each sequence.
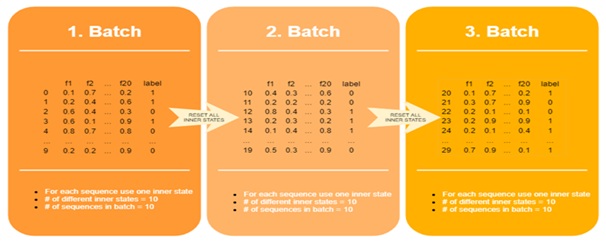
We have 30 samples and choose a batch size of 10. For each row in the batch we have one inner state leading to 10 inner states in the first batch, 10 inner states in the second batch and 10 inner states in the third batch.
The inner state and all the outputs of one row / sequence are deleted when the sequence is processed. In an LSTM layer, we do not reset the inner state and the outputs after each batch.
We delete them after each epoch, which means that we use and update one internal state for one sequence across multiple batches.
We assume we have 30 samples and each sample will contain the information of the last 10 time steps with two features.
lstm keras tutorial
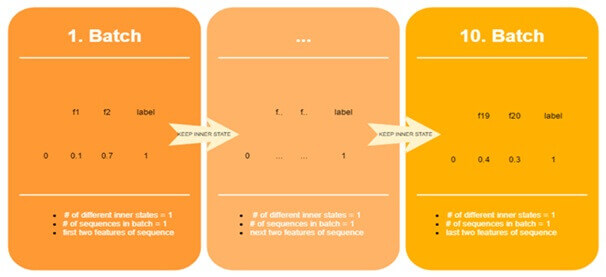
model. add(LSTM (50, batch_shape= (1, 10, 2), stateful=True)
Then choose (1, 10, 2) as a parameter each sequence (1) over 10 batches containing 2 features.
Every batch contains one timestep of the sequence (10*2 = 20).
The contains the first timestep (t-9) of the first sequence; then second batch contains the second timestep (t-8) of the first sequence etc.
Leading to the use of 10 batches to process the first sequence.
While a stateless LSTM would reset the inner state between the batches we pass inner set and output.
Requirements for running the code for Keras LSTM Model:-
- Python 2/3:- download python by website
- Pandas for data analysis:-After downloading python you can install pandas with the help of pip.
Pip/pip3 install pandas
- Matplotlib:- One can download it using pip ,
pip/pip3 install matplotlib
- Install sklearn:-Used to split the dataset to training and testing part.
pip/pip3 install numpy scipy scikit-learn
- Install Keras: - The library is used to implement LSTM in its sequential model. pip/pip3 install keras
We will load the dataset in the form of .csv file.
The aim of this code is that we provide some test data to the trained model and the model will predict what should be the output of that data which is the close price.
Then compare this close price with the actual price and will analyze how much intelligence model has become after training.
Install keras:-.
Install by typing $ pip in your command line and it should have output a list of commands and options.
Pip install keras
Python file and name it keras_cnn_example.py.
Import libraries and modules:-
Importing numpy and setting a seed for the computer pseudorandom number generator. And allows us to reproduce the results from our script:
Import numpy as np
Np.randim.seed (123)
This is simply a linear stack of neural network layers, and perfect for the type of feed-forward CNN.
From keras.models.import sequential
These are the layers that are used in any network,
From keras.layers import dense, dropout, activation, flatten
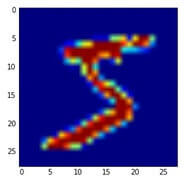
Load image data from MNIST:-
MNIST it is a great dataset for deep learning and computer vision. It's a big challenge to warrant neural networks.
Keras library conveniently includes it already,
From keras.datasets import mnist
(X_train, y_train), (X_test, y_test) =mnist, load_data ()
From matplotlib import pyplot as plt
Plt.imshow (X_train [0])
Output:-
Preprocess input data for Keras:-
Using the Theano you must declare a dimension for the depth of the input image.
The full-color image with all 3 RGB channels will have a depth of 3.
Our MNIST images have a depth of 1but we must declare that.
X_train=X_train.reshape (X_train, shape [0], 1, 28, 28)
X_test=x_test.reshape (x_test.shape [0], 1, 28, 28)
We print x_train,
Print x_train.shape
The preprocessing step for input data is to convert our data type to float32.
Then normalize our data values to the range [0, 1].
Then convert the data type and normalize values.
X_train=x_train.astype (‘float 32’)
X_test=x_test.astype (‘flaot32’)
X_train/=255
X_test/=255
The preprocess class labels for Keras:-
Then look at the shape of our class label data
Print y_train.shape
Y_train=np_untils.to_categorical (y_train, 10)
Y_train=np_untils.to_categorical (y_train, 10)
Define model architecture:-
Declare Sequential model
Model=sequential ()
Declare the input layer:-
model. add (convolution2D (32, 3, 3, activation=’relu’input_shape= (1, 28, 28)))