Opencv python tutorial image processing | opencv python tutorial face recognition
Opencv python tutorial image processing : In the year 1999 Gary bradsky started opencv by Gary Bradsky at Intel. Then vadim pisarevsky joined him to manage the open cv team. In the year 2000, the open CV was used on Stanley and active development. They support a variety of programming languages as java, c++ and ios. The interface is based on GPU operations based on CUDA. Python API is used for opencv and combines the best quality opencv and python languages. This library has more algorithms and capable of processing the videos, images. Opencv also supports platforms like Linux, windows, and macOS. The opencv is fast and useful as compared to other libraries. Opencv is open source means available free for both non-commercial and commercial use. OpenCV Python is nothing but a wrapper class for the original C++ library used with Python. OpenCV array structures get converted from the NumPy arrays. This makes it easy to integrate it with other libraries which we use NumPy.
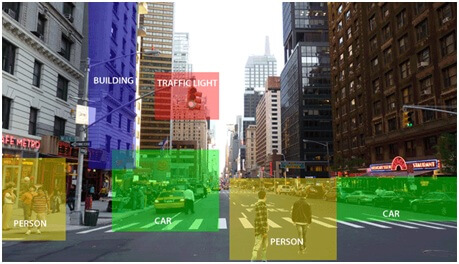
Computer vision:- The main use of computer vision is to understand the images. They will extract a description from pictures as text, objects, etc. The cars are identified by computer vision by following types as,
Example:-
Import cv2
Img=cv2.imread (“e:/pic.jpg”)
Img=cv2.resize (“original image”, img)
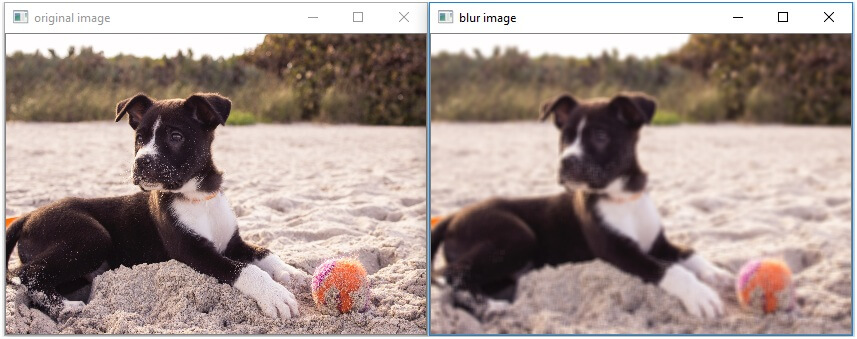
Img=cv2.blur (img, ksize= (5, 5))
Cv3.imshow (“blur image”, img)
Output:-
Advantages of computer vision:-
1) Fast:- Opencv is written in c++ so the performance is fast.
2) Open source:- It is freely available to modify and customize to individual requirements.
3) Easy to code:- The coding is easy as compared to other languages and don’t care about the memory management, etc.
4) Integration is easy:- The numpy arrays are used which are easy to perform operations and data is used with libraries as scikitlearn and matplotlib.
5) Easy prototyping:- The prototypes are built quickly in short and clean code.
The computer vision will allow the computer to perform the same tasks as humans with the same efficiency.
There are two main task are,
1) Objects Classification –
We train a model on a dataset of particular objects and the model will classify new objects as belonging to one or more of your training categories.
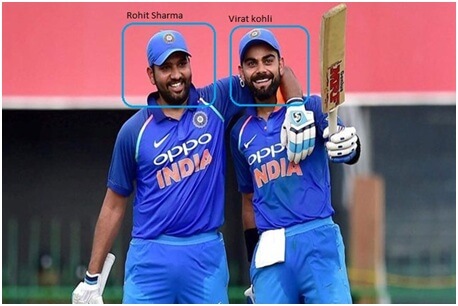
2) Objects Identification –
Here our model will identify a particular instance of an object.
For example, parsing two faces in an image and tagging one as Virat Kohli and another one as Rohit Sharma.
Install OpenCV using Anaconda:-
The first step is to download the latest Anaconda graphic installer for Windows from its website
Then choose your bit graphical installer and install the latest version of python.

Then choose the graphical bit installer

After that open the Anaconda prompt and type command.
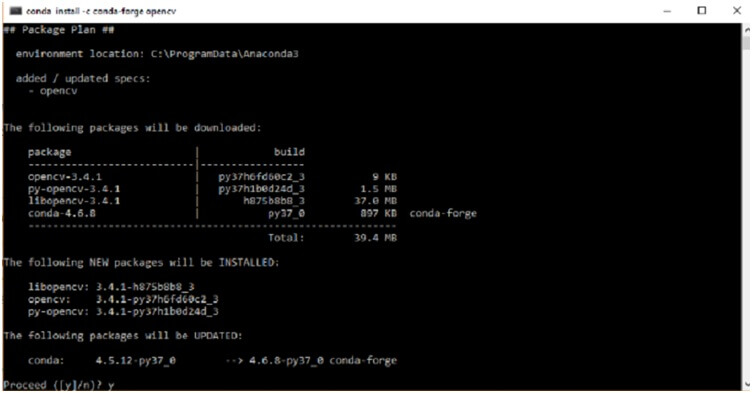
1. conda install -c conda-forge opencv
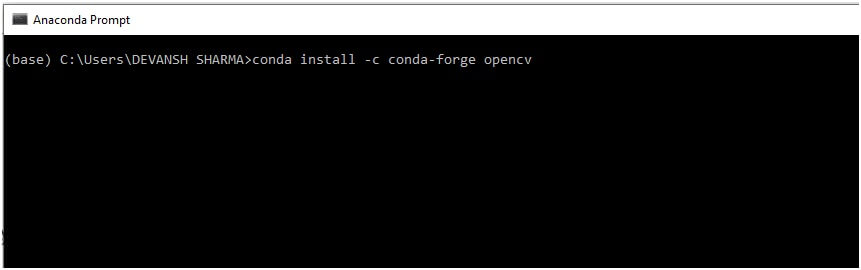
Then press the Enter button and it will get downloaded.
Install OpenCV in the Windows via pip:-
OpenCV is necessary to install Python in the system and install OpenCV using pip command:
- pip install opencv-contrib-python --upgrade
- pip install opencv-python

Then open the command prompt and type the given code to check if the OpenCV is installed or not.

Installation OpenCV in MacOS:-
The main advantage of using the Homebrew is that they will simplify the installation process.
Also requires a few commands to install and installation steps are the following,
Step-1: Install the Xcode command line Tools
Xcode type the following command to install,
- sudo xcode-select --install
To verify that it installed successfully
- sudo xcode-select -p
Step-2: Install Homebrew
To install Homebrew, type the command,
- ruby -e "$(curl -fsSL https://raw.github.com/Homebrew/homebrew/go/install)"
A shell script .bashrc is located in your home directory that Bash runs whenever it is started interactively.
- echo $HOME
It should display output like
- Users/MATHEW
Step-3: Install Python 3
To start with OpenCV it is important to install Python.
To install Python 3 using Homebrew, type the command as follows,
- brew install python3
Then check the python version by running the following command:
- python3 --version
Step - 4 Install OpenCV
To install the OpenCV3 type command as follows,
- brew install opencv3 -with-contrib -with-python3
Setup a Python 3 Virtual Environment
The virtualenvwrapper packages provide the facility to set the virtual environments.
It is important to set the virtual environment to work with multiple projects without introducing conflict.
To install virtualenv and virtualenvwrapper we use pip.
- pip3 install virtualenv and virtualenv virtualenvwrapper
Need to update ~/.bashrc:
- VIRTUALENVWRAPPER_PYTHON ='/user/local/bin/python3'
- Source/user/local/bin/virtualenvwrapper.sh
- export WORKON_HOME = $HOME/.virtualenvs
We can create a Python 3 virtual environment:
- mkvirtualenv cv3 -p python3
Access the OpenCV by using the following command.
- workon cv3
The command activates the OpenCV in the system.
Basic Operations with OpenCV:-
Many concepts are ranging from loading images to resizing them and so on.
The machines facilitate the conversion of vision and store it in memory.
The value of the pixel is used to convert images into the numbers. Pixels are the smallest unit of an image that is displayed and represented on a device.
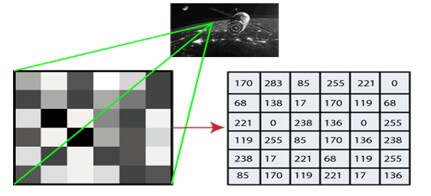
The picture intensity at the location is represented by the numbers.
We have shown the pixel values for a grayscale image that consists of only one value and intensity of the black color is at that location.
There are two ways to identify the images:-
1. Grayscale
Grayscale images are the images that contain only two colors black and white.
The contrast measurement is black and treated as the weakest intensity and white as the strongest intensity.
While using a grayscale image the computer will assign each pixel value based on its level of darkness.
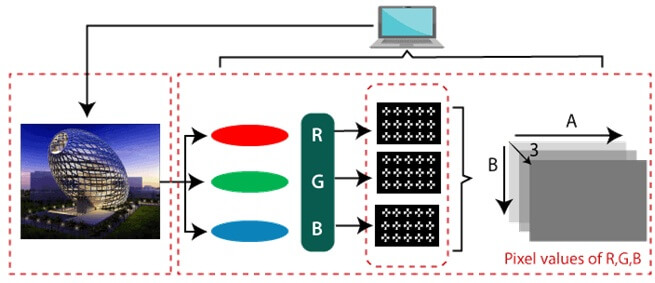
2. RGB
The RGB is a combination of the red, green, blue color which together makes a new color.
The computer will retrieve the value from each pixel and put the result in an array which is to be interpreted.
Use of computer vision:-
- It is available for free of cost.
- The OpenCV library is written in C/C++ so it is fast also python it.
- RAM is less to use as 60-70 MB.
- Computer Vision is portable as OpenCV and run on any device.
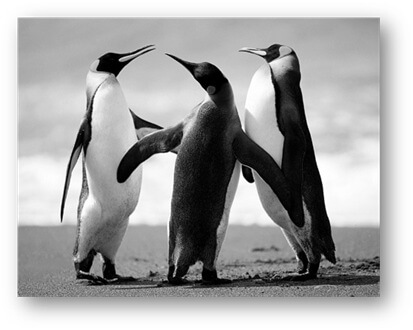
Load an image using OpenCV:-
Import cv3
Img=cv2.imread ("penguins.jpg”, 1)
Img_1=cv2.imread ("penguins.jpg”, 0)
The use of code is to import the OpenCV module.
Then we can read the image using imread module 1 in the parameters denotes that it is a color image.
If the parameter was 0 instead of 1, it means that the image being imported is a black and white.
The name of the image is ‘Penguins’.
Image Resolution/shape:-
We use the shape sub-function to print out the shape of the image.
Import cv2
Img=cv2.imread (“Penguins.jpg”, 0)
Print(img.shape)
Displaying the image:-
Display an image using OpenCV is simple and straightforward.
Import cv2
Img=cv2.imread (“Penguins, jpg”, 0)
Cv2.imshow (“Penguins”, img)
Cv2.waitKey (0)
Cv2.destroy Allwindows ()
First importing image using the imread.
Then use the imshow function to display the image.
There are 2 parameters to imshow function named as of the window and the image object to be displayed.
The next is waitKey that makes the window static until the user presses a key.
Then the parameter passed to it is time in milliseconds.
At last, we use destroyAllWindows to close the window based on the waitForKey parameter.
Resizing the image:-
The resizing an image is very easy.
Import cv2
Img=cv2.imread (“Penguins.jpg”, 0)
Resized_image=cv2.resize (img, (650,500))
Cv2.imshow (“Penguins”, resized_image)
Cv2.waitkey (0)
Cv2.destroyAllWindows ()
This function is used to resize an image to the desired shape.
The parameter here is the shape of the new resized image and image object changes from img to resized_image.
Face Detection Using OpenCV
Step 1: we will require an image, to begin then we need to create a cascade classifier that gives us the features of the face.
Step 2: This step involves making use of OpenCV which read the image and the features file.
We need to search for the row and column values of the face NumPy ndarray and the array is with the face rectangle coordinates.
Step 3: This last step involve displaying the image with the rectangular face box.
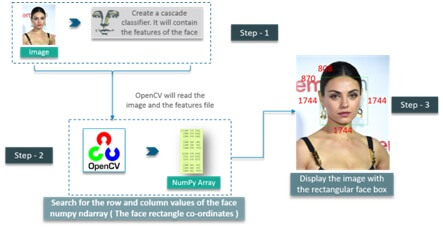
First step is to create a CascadeClassifier object to extract the features of the face as explained earlier.
The path to the XML file containing the face features is the parameter here.
Then next step would be to read an image with a face on it and convert it into a black and white image using COLOR_BGR2GREY.
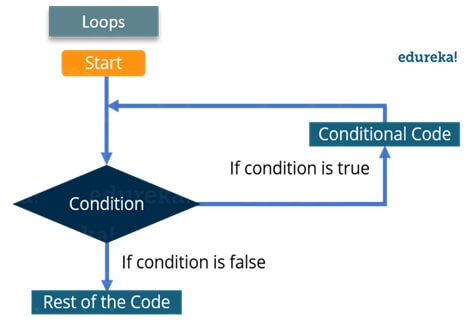
Capturing Video Using OpenCV:-
This process is simple and the loop will give you a better idea.
Capturing Video:-
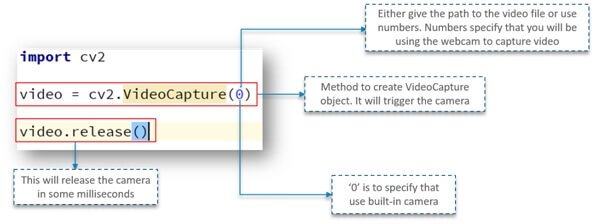
We import the OpenCV library as usual and then by a method called VideoCapture which is used to create the VideoCapture object.
It is used to trigger the camera on the user’s machine.
The parameter to this function denotes if the program makes use of the built-in function ‘0’ denotes the built-in camera in this case.
Installing OpenCV and imutils on your system:-
The first step is to install OpenCV on your system.
After the installation of a fresh OpenCV development environment, we install the imutils package via pip.
We have created and maintained imutils for the image processing and it is used on my blog.
Then install imutils in the same environment in which you installed OpenCV.
Pip install imutils
Application of opencv:-
1) Industrial automation:-
The inspection and classifying the objects into different ways.
The robot is used in computer vision algorithms to perform the task of separating the objects into categories.
2) Event detection:-
The cameras are present everywhere on roads, offices, etc and the surveillance 24/7 is not possible.
So the computer vision allows monitoring events at runtime and detecting actions.
The ANPR called as automatic number plate recognition is used to control vehicle tracing and counting number of people.
3) Medical image processing:-
The computer vision is also used in imaging the data and provides better prediction and treatment to diseases.
Examples as blood flow, x-ray images that are interpreted by humans.
4) Artificial intelligence:-
It is very much popular in the market today and used to detect, find the paths as traffic signals, traffic lights decide the action to be taken.
5) Military applications:-
The computer vision is best for the area of the computer version.
They also use the sensors of the image sensors and analyze information using sensors.
The sensors provide information provided by sensors and detect enemies or vehicles.
Reading an image in OpenCV using Python:-
Pip install opencv-python
Pip install numpy
Pip install matplotlib
Input image:-

- Example using Numpy:-
Import numpy as np
Import cv2
Img=cv2, imread (‘cc.jpg’, 0)
Cv2.imshow (‘image’, img)
- Example using Matplotlib:-
Import cv2
Import numpy as np
Import matplotlib.pyplot as plt
Img=cv2.imread (‘photo.jpg’, cv2.IMREAD_GRAYSCALE)
Cv2.imshow (‘image’, img)
Cv2.waitKey (0)
Cv2.destroyAllWindows ()
Output:-