pyqt gui tutorial with pyqt gui examples
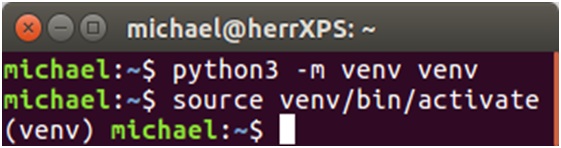
pyqt gui tutorial with pyqt gui examples: The PyQt us the Qt framework for creating the GUI interface or GUI. The PyQt is used for the Qt GUI framework from python. The Qt is written in c++ using python and builds many applications. It will refer to the recent versions and find Qt4 on the web. The API is identical under LGPL and used for free commercial projects. The best way to manage dependencies is through the environment. This environment is simple and a local directory that contains the libraries for a specific project. The system is a wide installation of those libraries which affect all of your other projects as well. The virtual environment in the current directory will execute the following command as, python3 -m venv venv They will create the venv/ folder and activate the virtual environment on Windows. It is run as, call venv/scripts/activate.bat Also done on Mac and Linux as, source venv/bin/activate
To install PyQt the following command,
pip install PyQt5==5.9.2
Creating a GUI:-
The time to write the first GUI app with the virtual environment still active is to start with Python.
The following command is executed,
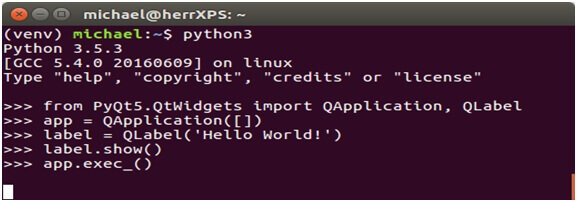
The Python is loaded to PyQt via the import statement,
from PyQt5.QtWidgets import QApplication, QLabel
We create a QApplication with the command as,
app = QApplication ([])
Every GUI app must have one instance of QApplication.
The brackets [] in the line will represent the command line arguments passed to the application.
Our app doesn't use any parameters so we leave the brackets empty.
We create a simple label,
label = QLabel ('Hello World!')
Label is shown by Qt as,
label.show ()
![]()
The last step is to have control over to Qt and ask it to "run the application until the user closes it" done by the command,
app.exec_()
We’re importing the QtGui which deals with all things GUI with PyQT.
- QtGui – It deals with the graphical elements.
- QtCore – the other non-GUI essentials.
- QtNetwork – also networking.
- QtOpenGL – It allows for the incorporation of OpenGL.
- QtSql – The wrapper for SQL handling.
- QtSvg – It will support for support vector graphics.
- QtXML – also used for handling XML data
We need some sort of application definition by,
app=QtGui.QApplication (sys.argv)
We create a QApplication object and save it to "app."
Then we pass the sys.argv argument because sys.argv allows us to pass command-line arguments to the application.
Window=QtGui.QWidget ()
Window.setgeometry (0, 0,500,300)
We can modify the window a bit and the applications of windows are created in memory first.
The .setGeometry is a method will belong to a few methods but here the method is the QtGui.
QWidget class will take four parameters from us.
Starting x coordinate then you has the starting y coordinate (0 and 0).
The window dimensions are 500 and 300 meaning 500 pixels wide and 300 tall.
Window.setwindowTitle (“PyQT Tuts!”)
The method will set the window's title to what we choose.
The content with the GUI that we have built,
Window.show ()
The building of GUI applications using PYQT designer tool is needless time consuming than code the widgets.
It is a fast and easy way to create GUI’s.
The importing of tkinter package by following code,
pyqt gui Example:-
From tkinter import*
Window=TK ()
Window.r=title (“welcome to like Geeks app”)
Window.mainloop ()
Output:-
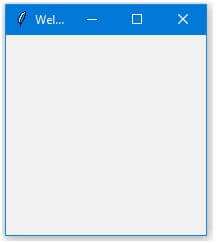
The last line will call main loop function and this function calls the endless loop of the window.
So the window will wait for user interaction till we close it.
If you forget to call the main loop function there is nothing to display.
Advantage of GUI:-
The application should be used by users immediately and find functionality.
The disadvantage of GUI:-
It has more work for the programmers don’t need to be designed