pyqt5 designer tutorial
pyqt5 designer tutorial for beginers: The pyQt5 is the set of python building for Qt v5.they are implemented more than 35 extension modules.
Also, enable python to use an application for development language to c++ and support platform as Android and ios.
The PyQt5 is used module in building the GUI applications in python.
The advantage of using PyQt5 is the designer that it makes easy to develop complex GUI applications in less time.
In this process, we need to drag the widget to build the form.
We use the Python 3.6 version on windows 10 as it is a big library.
The Q5 is a big method to know and need to walk you.
There are many features of PyQt5 one of them is it is very easy to learn.
The PyQt is a wrapper for Qt and helpful for the Qt documentation.
The modules of the PyQt5 are as follows,
- Qtcore
- QtGui
- Qtwidgets
- QtMultimedia
- Qtbluetooth
- Qttest
- Qtsql
- Qtpostioning
- Qtwebsocket
- Qtnetwork
The module will contain the non-GUI functionality as these modules are used for working time.
The QtGui will have classes for windows systems event handling, and basic imaging.
They have classes that provide a set of elements for creating UI. The QtBluetooth module class is used to scan devices and then connect, interact with them.
These classes used for network programming and facilitating the coding of TCP/IP and UDP clients and servers. The QtPositioning will contain the classes that determine positions using the sources like satellite, Wi-Fi, or a text file.
QDate, QTime, QDateTime:-
The PyQt5 has QDate, QDateTime, QTime classes to work with date and time.
QDate is a class for working with a calendar date in the calendar.
The method for determining the date will compare or manipulate dates.
The QTime class will work with a clock time and provides methods for comparing time, determining the time.
Current date and time:-
The currentDate (), currentTime () and currentDateTime () methods is used for determining current date and time.
Features are:-
- GUI
- Networking
- SQL database
- Web toolkits
- XML processing
Qt:-combines the classes/modules below into a single module.
Qtcore:-will contain the no graphical classes used by other modules.
Qtwidgets:-it contains most widgets available in PyQt5.
QtNetwork:-they contain class used to implement programming through Qt.
QtMultimedia:-also provides multimedia functionality.
PyQt5 Widgets:-
List of widgets in PyQt5,
- QLineEdit:-
It is an input field that allows one line of text to be entered by the user.
Line=QLineEdit ()
- QRadioButton:-
Called as input field with a selectable button, which is similar to the radio buttons in HTML.
Rad=QRadioButton (“buttontitle”)
Rad.setChecked (True)
- QcomboBox:-
Used to display the dropdown menu with list of selectable items.
Drop=QComboBox (w)
Drop.addItems([“item one”,”item two”,”item three”])
- QCheckBox:-
It displays a selectable square box in front of the label that is ticked if selected.
Check=QCheckBox (“button title”)
- QMenuBar:-
It displays a horizontal menu bar at the top of a window. Here we can only add objects of the QMenu class to this bar.
As the QMenu objects contain strings QAction objects or other QMenu objects.
- QToolBar:-
It is a horizontal bar that can be moved within the window and contain buttons and other widgets.
- QTab:-
It is used to break down the contents of a window into multiple pages.
They are accessed through different tabs on top of the widget as it consists of two sections as,
- The tab bar
- And the tab page.
QScrollBar
It is used to create scroll bars that allow the user to scroll up and down within a window.
They consist of a movable slider, a slider track, and two buttons to scroll the slider up or down.
Scroll=QScrollBar ()
- QSplitter:-
They are used to separate the contents of a window and the widgets are grouped properly.
- QDock:-
The dock widget contains two properties as:-
- It is moved within the main window
- It can be docked outside the parent window to another location.
Layouts and Themes:-
The two important classes that are used in Qt to create and manage layouts,
- QBoxLayout
- QGridLayout
- QBoxLayout:-
It is used to align the child widgets of the layout in a horizontal or vertical row.
The classes which inherit from QBoxLayout are:
- QHBoxLayout: - they are used to line the child widgets horizontally.
- QVBoxLayout: - as used to line the child widgets vertically.
Process of installing PyQt5:-
Here we have two versions as the commercial and free GPL version.
The installation process will also take two steps as,
Using pip, by the source.
$pip3 install PyQt5
The code is run as,
Import PyQt5
If the errors don’t occur it means you have successfully installed PyQt, but if you get an error then you may use a supporting version of python.
Using source On Linux:-
- Install SIP
- Then download PyQt5
- Then configure and install
The tool will make binding is called SIP.
So to install PyQt5 from source, you need to install SIP.
Then to install SIP, we have to run the command as:
$pip3 install PyQt5-sip
It is ready to download and install PyQt5.
Then unpack the source and run the commands inside the root of the uncompressed folder,
$python3 configure.py
$make
$make install
Using source On Windows:-
The SIP needs the GCC compiler and you need to install the minGW means the window port of Linux GCC compiler.
$python configure.py—platform wins 32-g++
$make
$make install
We Install PyQt5 designer:-
The two ways to build GUI apps using PyQt5 are,
- We design widgets by code.
- By Using PyQt5 designer.
We will use the PyQt5 designer that makes it easy to finish the work in a few seconds.
The PyQt5 designer is shipped with PyQt5 tools and to install it we need to install PyQt5 tools.
$pip3 install PyQt5-tools
After installation find Pyqt5 on the following location,
C:\programfiles\python36\Lib\site-packages\pyqt5-tools\
The PyQt5 designer is on this location:-
C:\Users\LikeGeeks\AppData\Local\Programs\Pythom\python36-32\lib\site-packages\pyqt5-tools\
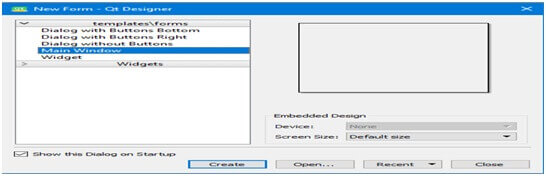
The PyQt installer will come with a GUI builder tool called Qt Designer.
By using the drag and drop interface a GUI interface can be built without writing the code.
Qt Designer doesn’t have the facility to debug and then build the application.
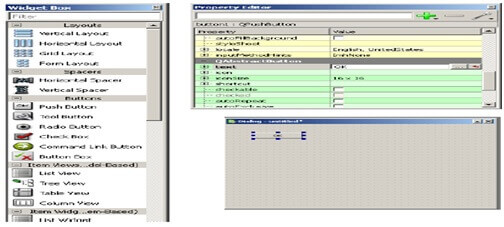
The creation of a GUI interface using the Qt Designer will start with choosing a top-level window for application.
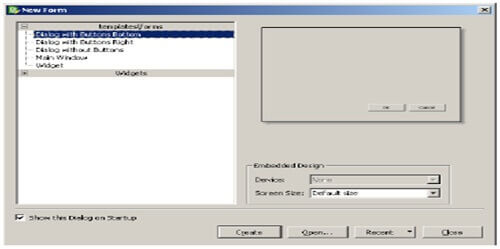
The drag and drop are required widgets from the widget box on the left pane.
Then we assign value to properties of widget laid on the form.
<
The design is translated into Python by using pyuic4 command line utility.
This utility is a wrapper for uic module and usage of pyuic4 is as follows −
pyuic4 demo.ui –o demo.py –x
The -x switch will add a small amount of code to XML as it becomes a self-executable application.
Example:-
If__name__==”__main__”:
Import sys
App=QtGui.QApplication (sys.argv)
Dialog=QtGui.QDialog ()
Ui=Ui_Dialog ()
Ui.setupUi (Dialog)
Dialog.show ()
Sys.exit (app.exec_ ())
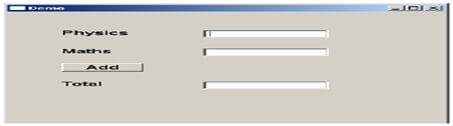
Output:-
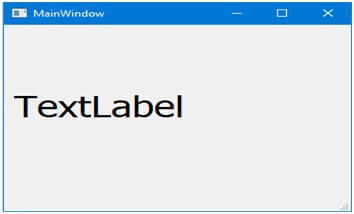
Change Font:-
To change the QLabel font we use the setFont () method,
From PyQt5 import Qtwidgets, QtGui
From mydesin impory Ui_main window
Import sys
Class mywindow (QtWidgets.QMaunWindows):
Def_init_ (self):
Super (mywindow, self).__init__ ()
Self.ui=Ui_MainWindow ()
Self.ui.setupUi (self)
Self.ui.label.setFont (QtGui.QFont (‘sansserif’, 30))
App=QtWidgets; .QApplication ([])
Application=mywindow ()
Application. show ()
Sys.exit (app.exec ())
Change size:-
The QLabel size is needed to set the geometry using setGeometry () method as,
From PyQt5 import Qtwidgets, QtGui, Qtcor
From mydesign import ui_MainWindow
Import sys
Class mywindow (Qtwidgets.QMainWindow):
Def__init__ (self):
Super (mywindow, self) __init__ ()
Self.ui.setupUi (self)
Self.ui.label.setFont (QtGui.QFont (‘sansserif’, 30))
Self.ui.label.setGeometry (QtCore.QRect (10, 10,200,200))
App=QtWidgets.QApplication ([])
Application=mywindow ()
Application.show ()
Sys.exit (app.exec ())
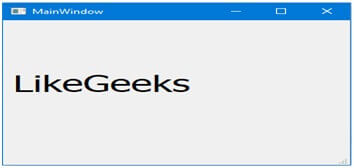
Change text:-
To change the QLabel text we use the setText () method as follows,
From PyQt5 import Qtwidgets, QtGui
From mydesign import ui_MainWindow
Import sys
Class mywindow (QtWidgtes.QMainWindow):
Def__init__(self):
Super (mywindow, self).__init__ ()
Self.ui=Ui_MainWindow ()
Self.ui.setupUi (self)
Self.ui.label.setFont (QtGui.QFont (‘sansserif’, 30))
Self.ui.label.setGeometry (QtCore.QRect (10, 10,200,200))
App=QtWidgets.QApplication ([])
Self.ui.label.setText (“LikeGeeks”)
App=QtWidgets.QApplication ([])
Application=mywindow ()
Application.show ()
Sys.exit (app.exec ())