qt designer python raspberry pi
The Qt platform is an independent application that runs on all the desktops and the operating systems.
The Os es will include Linux, windows embedded, and VxWorks.
The application will run across multiple platforms and qt will save a lot of time.
It has extensive API and well-documented features as highly integrated tools.
The application will run across platforms at near-native places.
The applications of Qt are,
- Touch screen
- USB
- Raspberry Pi
- Memory card adapter
The raspberry pi for Qt framework:-
- We download the raspbian operating system from the internet and then install it on the SD card.
- The connection of the internet is very important.
- The opening of raspberry pi id done by cltr+altr+t.
- After that, we check the GCC compiler.
- We install GCC by using the command as,
$ sudo apt-get install GCC
To install Qt creator we install the commands like,
$sudo apt-get update
sudo apt-get upgrade
sudo apt-get install qt-dev-tools
sudo apt-get install qtcreator
sudo apt-get git-core
sudo apt-get install subversion
After all steps, the Qt Creator will be added to the programming list on Raspberry Pi.
Then for Setting up Qt platform on Raspbian OS,
We have to run the Qt Creator for the first time,
- Go to Tools>Options>Build & Run>Compilers. The compilers window is displayed on Screen .(fig1)
- Then click on Add>GCC. Set the path to usr/bin/arm- linux-gnueabihf-gcc-4.9, as in fig2 then click on Apply to save changes.
- Go to Qt Versions>Add>Browse and select the latest version from Fig. 3 and Also click on Apply.
- Go to Kits>Add. We set Device Name as Raspberry Pi.
Select Device as Local PC from fig4 Click on Apply.
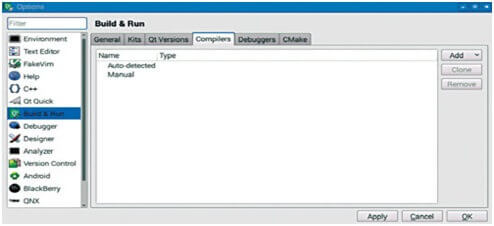
Fig. 1: Compilers window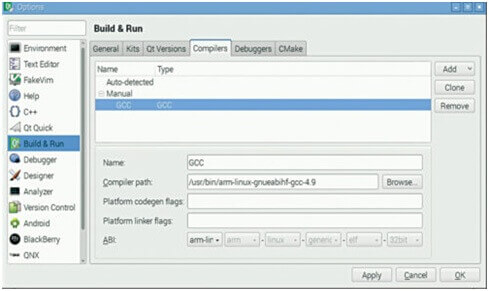
Fig. 2: Adding the path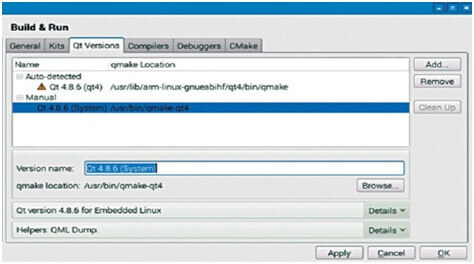
Fig. 3: Select latest version of Qt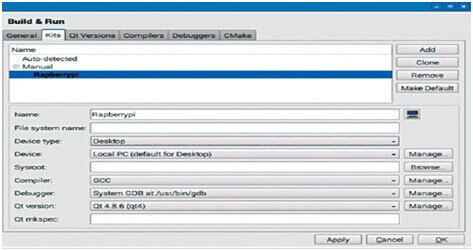
4. Select device type
Steps for project development with Qt:-
We start by clicking on New Project.
Select Applications>Qt Widgets Application>Choose as shown in Fig. 5.
The type in the name of your project and choose the destination folder where you want to save your project as shown in Fig. 6.
Select the kit as Raspberry Pi and then click on Next as in Fig. 7.
We continue with default names in the class information sub-window.
Click on Next.
Click on Finish.
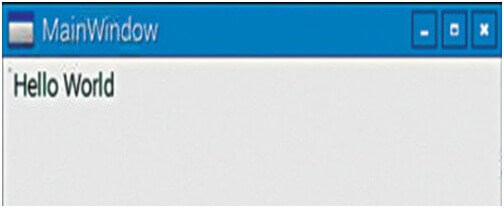
The new project called Hello World will be creating and Project Explorer will show all project files.
Click on Build>Build Project. The console window will show no errors if the kit is configured correctly.
Click on Build>Run. MainWindow will displays as shown in fig 10.
When you click on main.cpp, the default screen will appear.
Add the following code to main.cpp to display ‘Hello World’ on the main window form as shown in Fig. 11.
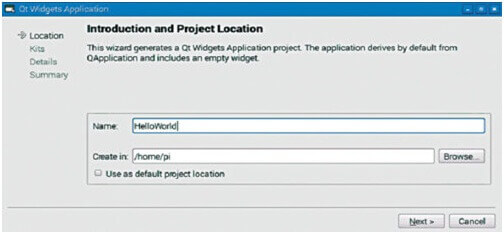
Fig. 5: Select Qt widgets application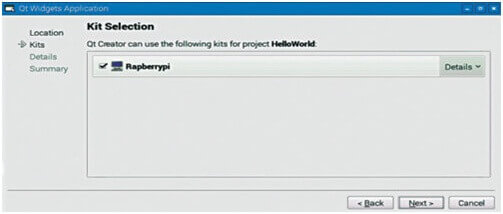
Fig. 6: Project name
Fig. 7: Select Raspberry Pi kit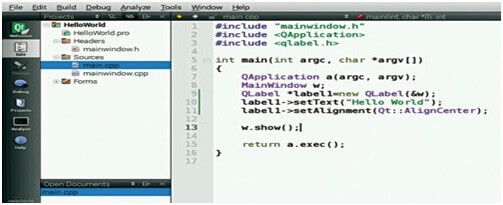
Fig. 8: Class information window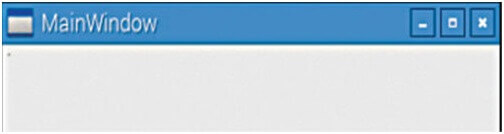
Fig. 9: HelloWorld project on Project Explorer window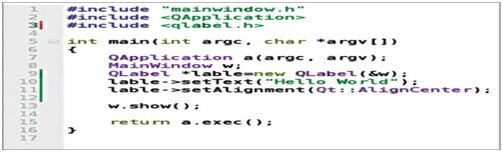
Fig. 10: Main Window screen
Example:-
Qlabel*label=new Qlabel (&w);
lable->setText=newQlabel (&w);
lable->setText= (“Hello world”);
lable->setAlignment (Qt::Aligncenter);
11. Click on Build>Run. The form with ‘Hello World’.